Anthropic개발 블로그Tutorials
Claude Code mod 시작하기
mod는 플러그인에 포함되어 Claude Code 세션 안에서 실행되는 hook입니다. 빈 폴더에서 mod를 직접 만들어 본 뒤, 규모가 더 큰 mod 두 가지를 살펴봅니다.
Claude Code는 이미 설정, 권한 규칙, 슬래시 명령어, skill, 상태 표시줄 등으로 동작 방식을 상당 부분 바꿀 수 있습니다. mod는 여기서 한 걸음 더 나아갑니다. Claude Code의 동작을 고쳐 쓰거나 아예 대체할 수 있고, 커스텀 UI도 그릴 수 있습니다. mod의 정체는 hook이며, 플러그인에 포함되어 배포됩니다. 각 mod는 세션 안에서 실행되는 작은 JavaScript 또는 TypeScript 모듈로, 발생하는 모든 이벤트를 그 자리에서 확인합니다.
덕분에 mod로 Claude Code를 내 작업 방식에 맞게 다듬을 수 있습니다. 자주 확인하는 정보를 화면에 띄우거나, 불안한 명령어 앞에 안전장치를 두거나, 내가 읽기 편한 방식으로 변경 사항을 보여 주는 리뷰 화면을 만들 수 있습니다.
이 가이드에서는 빈 폴더에서 mod 하나를 직접 만듭니다. 프롬프트 위에 컨텍스트 윈도우 상태를 실시간 예보처럼 보여 주는 Token Weather로, 코드는 약 80줄입니다. 이어서 규모가 더 큰 mod 두 가지, Blast Radius와 Replay Theater를 살펴보며 API로 또 무엇을 할 수 있는지 소개합니다.
Claude Code 2.1.287 이상이 필요합니다. mod는 기본으로 켜져 있으므로 따로 켤 필요가 없습니다. API는 릴리스마다 달라질 수 있습니다. Claude Code는 mod를 불러올 때마다 현재 빌드에 맞는 타입 선언을 mod의 .claude-plugin/types/ 폴더에 기록하며, 사용 중인 버전에서는 이 선언이 기준이 됩니다.
MOD의 동작 방식
mod는 JavaScript 또는 TypeScript 모듈에 동작이 담긴 Claude Code 플러그인입니다.
- 폴더는
.claude-plugin/plugin.json매니페스트를 갖춘 일반 플러그인입니다. hooks/hooks.json은modules아래의 모듈 하나를 지정합니다.- 모듈은
register(on, options)를 export합니다. 그 안에서on(event, matcher?, hook)로 hook을 추가합니다.
hook은 모두 같은 형태입니다.
on("tool.call", { tool: "Bash" }, async ($, e, next) => {
  // $    the mods API: ui, session, state, store, fs, process, clock, http, tool, command, model, ...
  // e    this event's input, as plain data
  // next passes e to the other plugins and then to Claude Code's own behavior
  return next(e);
});
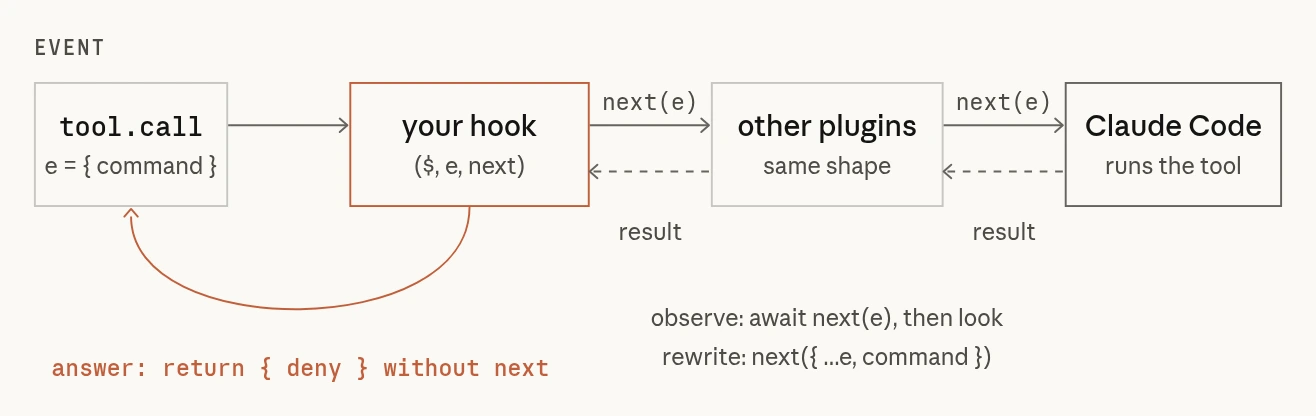
hook은 미들웨어처럼 체인을 이룹니다. 내 hook이 실행된 뒤 next(e)가 이벤트를 다음 플러그인에 넘기고, 체인 끝에서는 Claude Code가 원래 하려던 동작을 수행합니다. hook이 할 수 있는 일은 세 가지입니다.
| 동작 | 방법 | 예시 |
|---|---|---|
| 관찰 | const r = await next(e); /* look */ return r | 파일 편집을 모두 기록합니다. 턴이 끝날 때마다 수치를 측정합니다. |
| 수정 | return next({ ...e, command: safer }) | 체인의 나머지가 보게 될 내용을 바꿉니다. |
| 응답 | next를 호출하지 않고 return { deny: "…" } | 도구 호출을 거부합니다. 명령어나 도구를 직접 대신 처리합니다. |
이벤트는 도구 호출, 제출된 프롬프트, 턴의 시작과 종료, 세션의 시작과 종료, 슬래시 명령어, 그리고 화면의 각 요소가 그려지는 순간을 다루는 ui.render까지 폭넓게 아우릅니다. 모듈은 DOM도 Node도 없는 자체 샌드박스에서 실행되므로, 바깥세상과의 모든 상호작용은 $를 거칩니다.
설정 hook과 다른 점. 설정 hook은 이벤트마다 셸 명령어를 실행하고 stdin과 stdout으로 JSON을 주고받습니다. 반면 mod는 한 번 로드되면 세션 안에 계속 남아 있습니다. 상태를 유지하고, 이벤트에 따라 갱신되는 UI를 그리고, Claude Code를 다시 호출해 pane을 열거나 프로세스를 실행하거나 슬래시 명령어를 등록하거나 모델이 호출할 수 있는 도구를 등록할 수도 있습니다.
Claude Code도 mod를 씁니다. AGENTS.md 지원, 대화 옆의 /diff pane 등 Claude Code 자체 기능 중 일부가 mod로 만들어져 있습니다. 테스트를 포함한 소스는 공개 저장소 anthropics/claude-code의 mods/ 아래에 있으니, 팀이 어떻게 만들었는지 직접 읽어 볼 수 있습니다.
첫 MOD 만들기: TOKEN WEATHER
Token Weather는 매 턴이 끝날 때 컨텍스트 윈도우가 얼마나 찼는지 읽어 프롬프트 위에 한 줄로 그립니다. 날씨 아이콘, 사용 비율, 윈도우 대비 사용 토큰 수, 최근 턴의 작은 차트, 직전 턴에서 늘어난 양이 표시됩니다.
| 사용량 | 예보 |
|---|---|
| 25% 미만 | ☀ Clear |
| 25–49% | ☁ Cloudy |
| 50–74% | ☂ Showers |
| 75–89% | ☇ Storm |
| 90% 이상 | ↯ Compact soon |
실제 세션에서는 이렇게 보입니다. 턴마다 파일을 더 많이 읽을수록 띠가 ☀ Clear에서 ☂ Showers, ☇ Storm으로 바뀝니다.
지름길: Claude에게 만들어 달라고 하기
여섯 단계를 건너뛸 수도 있습니다. Claude Code는 mod 작성법을 알고 있으니, 원하는 mod를 설명하면 알아서 만들어 줍니다. claude로 세션을 시작하고 아래 프롬프트를 붙여 넣으세요.
Make me a Claude Code mod called token-weather: a live forecast of my context window, shown in the band above the prompt.

What it should show, on one line:
- A weather icon and word for how full the context window is: under 25% ☀ Clear (yellow), 25–49% ☁ Cloudy (cyan), 50–74% ☂ Showers (blue), 75–89% ☇ Storm (magenta), 90% and up ↯ Compact soon (red).
- The percentage used, then the tokens used out of the window, like "134.4k / 200k".
- A small chart of the last 12 turns, drawn with ▁▂▃▄▅▆▇█.
- How much the last turn added, like "▲ +98.3k last turn".

It should update after every turn.
Claude가 세션에서 hot reloading을 켤지 한 번 묻습니다. 허용하면 Claude의 턴이 끝날 때 프롬프트 위에 띠가 나타납니다. 이후에는 변경 사항이 즉시 반영되므로 "Storm을 70%부터 시작하게 해 줘", "끝에 비용(달러)도 추가해 줘" 같은 수정을 계속 요청하며 띠가 바뀌는 모습을 지켜볼 수 있습니다. 이 mod는 해당 세션에서만 로드되고 폴더도 나중에 정리되므로, 계속 쓰려면 폴더를 다른 곳에 복사해 일반 플러그인처럼 설치하세요(6단계).
프롬프트에는 보고 싶은 내용만 적혀 있다는 점에 주목하세요. mod를 만들기 위해 API를 알 필요는 없습니다. 구체적인 방법은 Claude Code에 내장된 mod 작성 가이드가 알려 줍니다. 리로드 후에도 상태가 유지되도록 어디에 저장할지, claude plugin validate로 플러그인을 어떻게 검증할지, 어떤 이벤트에 hook을 걸지 같은 내용입니다. "What it should show" 항목만 바꾸면 우리 것이 아닌 여러분의 mod가 됩니다.
구성 방식을 먼저 보고 싶거나 Claude가 작성한 코드를 확인하고 싶다면 계속 읽어 보세요.
1단계: 폴더 만들기
먼저 Claude Code 버전이 충분히 최신인지 확인합니다.
claude --version # 2.1.287 or later
다음과 같은 구조를 만드세요.
token-weather/
├── .claude-plugin/
│   ├── plugin.json
│   └── types/            (written by Claude Code when it loads the mod)
├── hooks/
│   ├── hooks.json
│   └── token-weather.mjs
├── types/
│   └── index.d.ts        (added in step 3)
└── tests/
└── token-weather.test.ts (added in step 5).claude-plugin/plugin.json는 표준 플러그인 매니페스트입니다.
{
  "name": "token-weather",
  "version": "0.1.0",
  "description": "A live forecast of the context window, drawn above the prompt.",
  "author": { "name": "You" }
}
hooks/hooks.json은 모듈을 가리킵니다. mod에는 모듈이 정확히 하나만 있어야 합니다.
{
  "modules": ["./token-weather.mjs"]
}
2단계: 화면에 그려 보기
프롬프트 바로 위의 띠는 AbovePrompt라는 컴포넌트입니다. Claude Code가 이 자리에는 아무것도 그리지 않으므로 첫 실습 대상으로 좋습니다. ui.render 이벤트에 hook을 걸고 요소 트리를 반환하세요.
// hooks/token-weather.mjs
export function register(on) {
  on("ui.render", { component: "AbovePrompt" }, ($, e, next) => {
    const { Box, Text } = $.ui.resolve(e);
    return Box({
      paddingX: 1,
      children: [Text({ color: "yellow", bold: true, children: "☀  Clear skies" })],
    });
  });
}
이 요소들은 전역 객체가 아닙니다. Claude Code가 그리는 화면(surface)마다 지원하는 요소 집합이 조금씩 달라서, $.ui.resolve(e)가 현재 그리는 surface에 맞는 생성자를 반환합니다. h를 팩토리로 지정하면 JSX도 쓸 수 있습니다.
플러그인을 로드한 채로 세션을 시작합니다.
claude --plugin-dir ./token-weather프롬프트 위에 "☀ Clear skies"가 나타납니다. 세션은 닫지 마세요. 폴더를 감시하고 있어서 저장할 때마다 재시작 없이 모듈이 그 자리에서 다시 로드됩니다. 이렇게 피드백이 빠르다는 점이 mod 작성의 재미를 크게 좌우합니다.
팁: 구조를 파악했다면 지름길에서처럼 다음 mod도 Claude에게 설명해 보세요. 같은 세션에서 hot reload되는 폴더에 플러그인을 작성해 줍니다.
3단계: 실제 수치를 읽어 $.state에 보관하기
$.session.usage()는 상태 표시줄과 같은 수치를 반환합니다. context.tokens는 마지막 응답이 처리된 입력 크기이고, context.window는 모델의 윈도우 크기이며, context.percent은 앞의 값을 뒤의 값으로 나눈 비율입니다. 이 호출은 비용이 들지 않습니다. breakdown을 요청할 때만 토큰 수 계산 요청을 보냅니다.
세션이 시작될 때와 매 턴이 끝난 뒤에 수치를 측정합니다.
on("session.start", async ($, e, next) => {
  const result = await next(e);
  await takeReading($);
  return result;
});

on("turn.complete", async ($, e, next) => {
  const result = await next(e);
  if (!e.agentId) {
    await takeReading($); // main-loop turns only, not subagents
  }
  return result;
});
두 hook 모두 next(e)를 먼저 호출한 다음 관찰만 합니다. 어느 쪽도 실제 동작을 바꾸지 않습니다.
측정값을 보관할 위치. 모듈 수준의 let readings = []이 당연한 선택처럼 보이지만, hot reload는 모듈을 새로 로드하는 것이라 register이 다시 실행되고 session.start도 다시 호출되며 모듈 변수는 초기화됩니다. 대신 기록은 $.state에 두세요. 호스트에 이름을 붙인 값을 세션 내내 보관하므로 리로드 후에도 유지됩니다.
// Held by the host, so the history survives a hot reload of this file.
const readings = { plugin: "token-weather", key: "readings" };

async function takeReading($) {
  const { context } = await $.session.usage();
  if (!context?.window) return;
  const tokens = context.tokens ?? 0;
  const percent = context.percent ?? Math.round((tokens / context.window) * 100);
  const { value: history = [] } = await $.state.get(readings);
  await $.state.set(readings, [...history, { tokens, window: context.window, percent }].slice(-HISTORY));
}
state 값은 플러그인의 타입 계약(type contract)에 선언합니다. 매니페스트가 가리키는 작은 .d.ts 파일입니다. 여기에 types/index.d.ts를 추가하세요.
export type TokenWeatherReading = { tokens: number; window: number; percent: number };

declare module "claude-code" {
  interface PluginState {
    "token-weather": { readings: TokenWeatherReading[] };
  }
}
그런 다음 plugin.json에 "types": "./types/index.d.ts"를 추가합니다. 이 단계를 건너뛰면 claude plugin validate가 해결 방법(token-weather.readings is not declared: the manifest's types contract must name it in interface PluginState { … })을 알려 주는 오류와 함께 중단됩니다.
대신 다시 그리기는 공짜로 얻습니다. render hook이 실행되는 동안 만든 $.state.get은 해당 화면을 구독하므로, 이후 $.state.set가 일어날 때마다 띠가 다시 그려집니다. $.ui.invalidate를 직접 호출할 일은 없습니다.
4단계: 예보 그리기
모듈 전체는 다음과 같습니다.
// Token Weather: a live forecast of the context window, above the prompt.

const HISTORY = 12;
const BARS = "▁▂▃▄▅▆▇█";
const FORECAST = [
  { upTo: 25, icon: "☀", word: "Clear", color: "yellow" },
  { upTo: 50, icon: "☁", word: "Cloudy", color: "cyan" },
  { upTo: 75, icon: "☂", word: "Showers", color: "blue" },
  { upTo: 90, icon: "☇", word: "Storm", color: "magenta" },
  { upTo: Infinity, icon: "↯", word: "Compact soon", color: "red" },
];

// Held by the host, so the history survives a hot reload of this file.
const readings = { plugin: "token-weather", key: "readings" };

export function register(on) {
  on("session.start", async ($, e, next) => {
    const result = await next(e);
    await takeReading($);
    return result;
  });

  on("turn.complete", async ($, e, next) => {
    const result = await next(e);
    if (!e.agentId) {
      await takeReading($); // main-loop turns only, not subagents
    }
    return result;
  });

  on("ui.render", { component: "AbovePrompt" }, async ($, e, next) => {
    const { value: history = [] } = await $.state.get(readings);
    if (e.props.hasSurvey || history.length === 0) {
      return next(e);
    }
    const { Box, Text } = $.ui.resolve(e);
    return band(Box, Text, history, e.props.bodyColumns);
  });
}

async function takeReading($) {
  const { context } = await $.session.usage();
  if (!context?.window) return;
  const tokens = context.tokens ?? 0;
  const percent = context.percent ?? Math.round((tokens / context.window) * 100);
  const { value: history = [] } = await $.state.get(readings);
  await $.state.set(readings, [...history, { tokens, window: context.window, percent }].slice(-HISTORY));
}

function band(Box, Text, history, columns) {
  const now = history[history.length - 1];
  const f = FORECAST.find((b) => now.percent < b.upTo);
  const parts = [
    Text({ color: f.color, bold: true, children: `${f.icon}  ${f.word}` }),
    Text({ children: `  ${now.percent}% of context` }),
    Text({ dimColor: true, children: `  ${short(now.tokens)} / ${short(now.window)}` }),
  ];
  if (columns >= 60) {
    parts.push(Text({ dimColor: true, children: "   last turns " }));
    parts.push(Text({ color: f.color, children: sparkline(history) }));
    if (history.length > 1) {
      parts.push(Text({ dimColor: true, children: trend(history) }));
    }
  }
  return Box({ flexDirection: "row", paddingX: 1, children: parts });
}

function sparkline(history) {
  const top = Math.max(...history.map((r) => r.tokens), 1);
  return history.map((r) => BARS[Math.floor((r.tokens / top) * (BARS.length - 1))]).join("");
}

function trend(history) {
  const delta = history[history.length - 1].tokens - history[history.length - 2].tokens;
  if (delta === 0) return "  steady";
  return delta > 0 ? `  ▲ +${short(delta)} last turn` : `  ▼ ${short(-delta)} last turn`;
}

function short(n) {
  if (n >= 1_000_000) return `${+(n / 1_000_000).toFixed(1)}M`;
  if (n >= 1_000) return `${+(n / 1_000).toFixed(1)}k`;
  return String(n);
}
내 mod에도 그대로 가져다 쓸 만한 세부 사항이 세 가지 있습니다.
- 컴포넌트의 props는
e.props에 있습니다.hasSurvey은 survey가 이 띠를 쓰고 싶어 한다는 뜻이므로, hook은next(e)로 자리를 양보합니다.bodyColumns는 띠의 실제 너비로, 대화 기록 옆에 pane이 붙어 있을 때는 터미널보다 좁습니다. 트리의 크기를 이 값에 맞추세요.e의 최상위에는e.component,e.surface,e.requestId,e.viewport만 있습니다. - 그릴 것이 없으면 넘기세요.
next(e)을 반환하면 띠를 Claude Code와 다른 mod에 돌려줍니다. - 이모지 대신 한 칸 너비 기호를 쓰세요. ☀ ☁ ☂ ☇ ↯는 어떤 터미널 글꼴에서도 정렬이 맞습니다.
파일을 저장하면 실행 중인 세션이 바로 반영합니다. 큰 파일을 읽는 턴을 몇 번 거치면, 이 섹션 처음의 녹화 화면처럼 띠가 Clear에서 Showers, Storm으로 바뀝니다.
5단계: 검증과 테스트
claude plugin validate는 Claude Code와 같은 방식으로 매니페스트와 모듈 소스를 읽고, 모듈이 어떤 hook을 걸고 무엇을 호출하는지 보고합니다.
$ claude plugin validate ./token-weather
  > types ./types/index.d.ts declares state: token-weather.readings
  > ./token-weather.mjs hooks: session.start, turn.complete, ui.render{component=AbovePrompt}
  > ./token-weather.mjs calls: $.session.usage (via takeReading), $.state.get, $.state.set (via takeReading), $.ui.resolve
  > ./token-weather.mjs state writes: token-weather.readings
  > ./token-weather.mjs state reads: token-weather.readings
√ Validation passed
claude plugin test는 플러그인의 *.test.ts 파일을 실제 Claude Code 런타임에서 실행합니다. 테스트에서 on로 등록한 hook은 체인에서 mod 뒤에서 실행되며 Claude Code가 내놓을 응답을 스텁 처리하므로, $.session.usage()이 반환하는 값을 정확히 제어할 수 있습니다.
// tests/token-weather.test.ts
import { describe, expect, test } from "claude-code/testing";

describe("token-weather", () => {
  test("the band follows the context window", async ($, on) => {
    // Hooks registered here run after the mod and stub what Claude Code would answer.
    let tokens = 36_100;
    on("session.start", ($, e) => ({ cwd: e.cwd }));
    on("session.usage", () => ({
      value: { startedAt: 0, rateLimits: [], context: { tokens, window: 200_000, percent: Math.round(tokens / 2_000) } },
    }));
    on("turn.complete", () => ({ text: "" }));

    await $.session.start({ surface: "terminal", isInteractive: true, cwd: "/work" } as any);
    const ui = await $.ui.mount({
      plugin: "token-weather",
      surface: "terminal",
      component: "AbovePrompt",
      props: { hasSurvey: false, isWorking: false, maxRows: 10, bodyColumns: 120 },
    } as any);
    expect(await ui.find({ type: "Text", text: /Clear/ })).toBeDefined();

    tokens = 134_400;
    await $.turn.complete({ reason: "answer", answer: "ok", durationMs: 1 } as any);
    expect(await ui.find({ type: "Text", text: /Showers/ })).toBeDefined();
    expect(await ui.find({ type: "Text", text: /67% of context/ })).toBeDefined();
    expect(await ui.find({ type: "Text", text: /▲ \+98\.3k last turn/ })).toBeDefined();
    await ui.unmount();
  });
});
$ claude plugin test ./token-weather
(pass) token-weather > the band follows the context window
 1 pass
 0 fail
이 테스트는 3단계에서 다룬 다시 그리기 동작도 확인합니다. mod가 다시 그리라고 요청하지 않아도 turn.complete 이후 띠가 갱신됩니다.
6단계: 공유하기
mod는 플러그인이므로 배포 방식도 같습니다. 마켓플레이스에 올리면 되는데, .claude-plugin/marketplace.json가 들어 있는 폴더 하나로도 충분합니다.
{
  "name": "my-mods",
  "owner": { "name": "You" },
  "plugins": [{ "name": "token-weather", "source": "./token-weather" }]
}
claude plugin marketplace add ./my-mods
claude plugin install token-weather@my-mods --scope user
MOD 공유하기
mod는 Claude Code 플러그인이므로 다른 플러그인과 똑같이 공유하면 되고, 새로 배울 것은 없습니다. 마켓플레이스 파일과 함께 mod를 GitHub 저장소에 올리면 그 저장소가 곧 마켓플레이스가 됩니다. 누구나 거기서 설치할 수 있고, 업데이트는 일반 push로 하면 됩니다.
Claude Code에서 명령어 세 개면 설치됩니다.
/plugin marketplace add your-org/my-mods
/plugin install token-weather@my-mods
/reload-plugins
mod는 리로드하면 시작됩니다. 나타나지 않으면 Claude Code를 재시작하세요.
mod는 내 컴퓨터의 Claude Code 안에서 Claude Code와 같은 권한으로 실행되는 코드이며, Anthropic이 아닌 게시자가 작성합니다. 따라서 패키지를 설치할 때처럼 저장소를 먼저 읽어 보고, 신뢰할 수 있는 사람의 mod만 설치하세요. 명령어를 실행하기 전에는 아무것도 설치되지 않습니다.
Claude 디렉터리가 mod를 포함한 플러그인을 받기 시작하면 claude.ai/directory/manage에서 내 mod를 제출할 수도 있어, 링크를 따로 알리지 않아도 사람들이 찾을 수 있습니다.
MOD 두 가지 더
Token Weather는 지켜보고 그리기만 합니다. 다음 두 mod는 이벤트에 직접 개입하고, pane을 열고, 입력을 받습니다.
Blast Radius: 위험한 명령어가 실행되기 전에 무엇이 바뀔지 확인하기
Claude가 rm -rf, git reset --hard, git clean, force push, 데이터베이스 마이그레이션 같은 명령어로 Bash를 호출하면 Blast Radius가 그 호출을 붙잡습니다. 명령어가 건드릴 대상을 계산한 뒤 Proceed와 Cancel 버튼이 있는 pane을 엽니다. 2를 누르면 Claude는 사유가 담긴 거부 응답을 받고, 1를 누르면 명령어가 작성된 그대로 실행됩니다.
hook은 세 개를 씁니다. Bash에 거는 tool.call, 그리고 Pane와 AbovePrompt에 거는 ui.render입니다. 핵심은 위 표의 "응답" 동작입니다.
on("tool.call", { tool: "Bash" }, async ($, e, next) => {
  const risk = classify(String(e.command ?? ""));
  if (risk === null) return next(e);                 // everything else runs as normal

  const report = await measure($, risk, await $.session.cwd());  // git status, git clean -n, du, ...
  held = { command: e.command, risk, report, decision: null };
  const opened = await $.ui.open({ id: "blast-radius", title: "Blast Radius", focus: true });
  if (!opened.isPlaced) held.where = "band";         // too narrow for a pane: draw above the prompt

  while (held.decision === null && !next.signal.aborted) {
    await $.process.run(["sleep", "0.25"]);          // time inside $ calls doesn't count against the hook's time limit
  }
  if (held.decision === "proceed") return next(e);   // let it run
  return { deny: `Blast Radius held this command: the user pressed Cancel. It would have: ${report.summary}.` };
});
이 mod에서 배울 점:
- dry run에는
$.process.run. 보고서는 각 도구 자체의 명령어인git status --porcelain,git clean -n,git log HEAD..origin/main,showmigrations로 만듭니다. 인자는 argv 배열로 전달하므로 경로에 들어 있는 문자열이 셸 코드로 실행되는 일은 없습니다. - 호출 붙잡아 두기. hook은 디스패치마다 고유한 시간 10초를 받지만,
$호출 안에서 기다린 시간은 포함되지 않습니다. 루프는 짧은sleep프로세스를 기다리다가 버튼의onPress가 결정을 내리면 빠져나오고,next.signal가 중단되면(Esc를 누른 경우) 포기합니다. - 단축키가 있는 버튼.
Button({ label: "Proceed", hotkey: "1", onPress })는 클릭, Tab과 Enter, 또는 숫자 키로 동작합니다. - 띠로 대체하기. 터미널이 충분히 넓으면 대화 기록 옆에 pane을 붙입니다.
$.ui.open가isPlaced: false로 답하면 같은 보고서를 프롬프트 위에 그립니다.
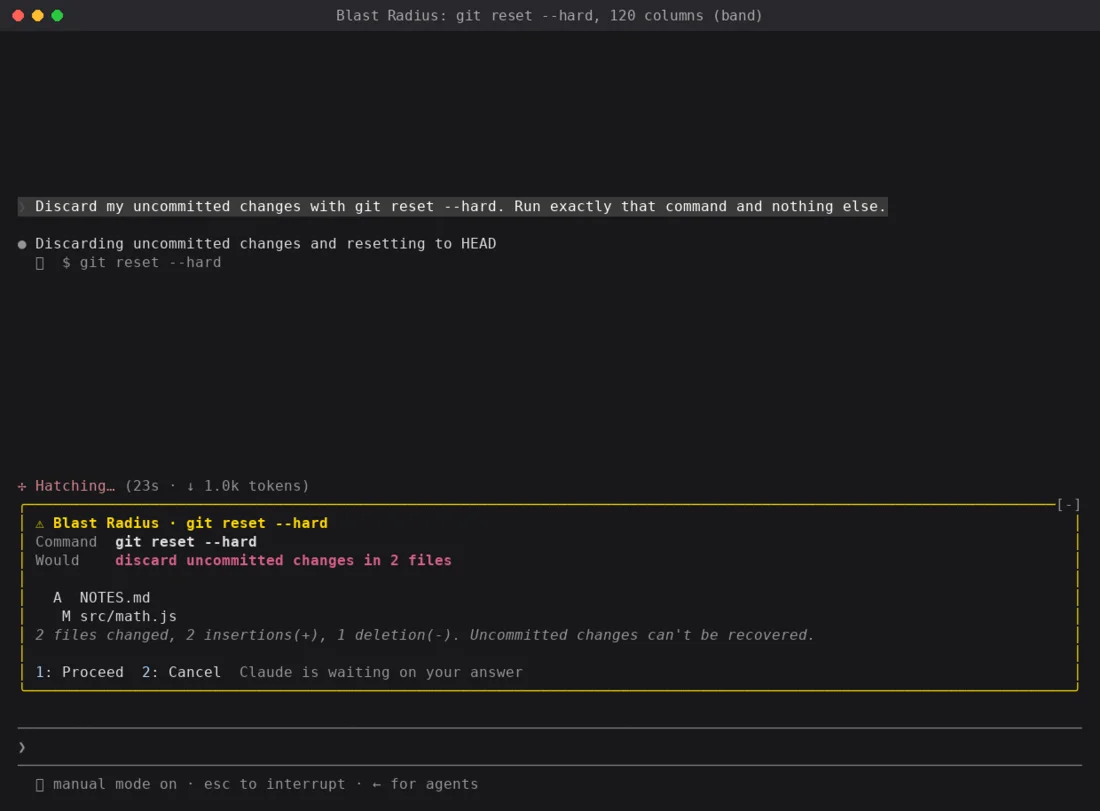
이 mod는 안전망일 뿐 권한 시스템이 아닙니다. 명령어 텍스트를 읽는 방식이라 $(…), 별칭(alias), rm를 호출하는 스크립트는 통과합니다. 확실히 차단하려면 권한 규칙을 쓰세요.
Replay Theater: 직전 턴의 편집을 한 단계씩 되짚어 보기
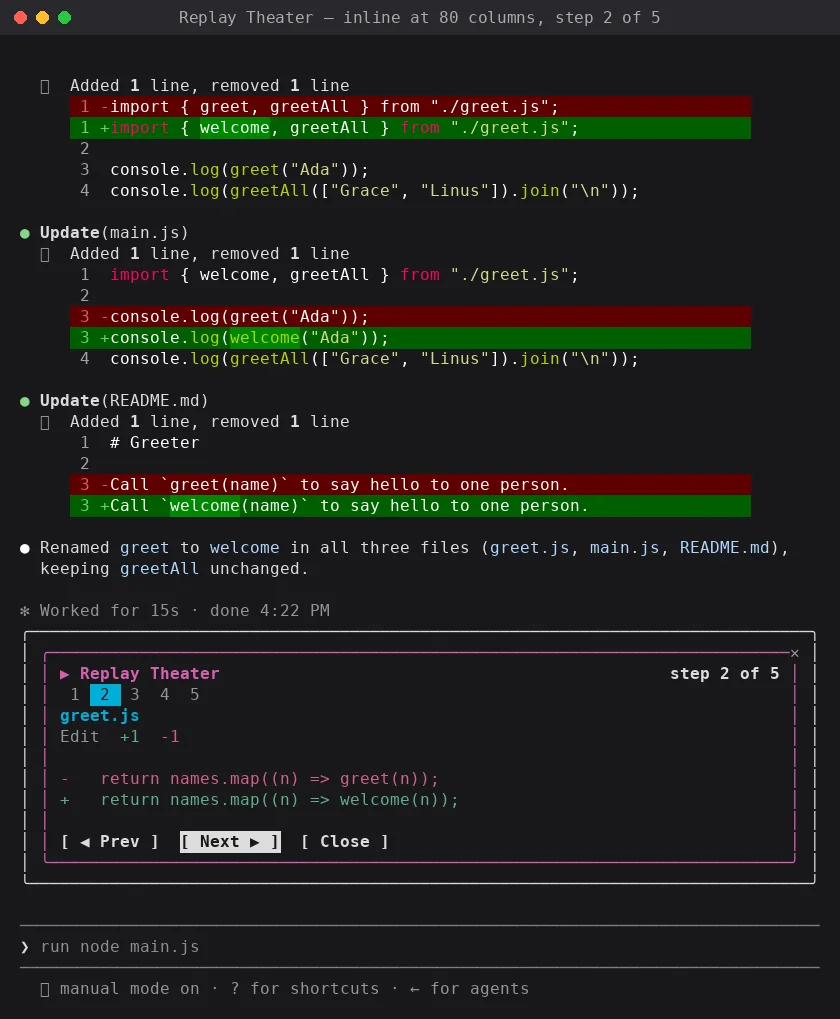
턴이 진행되는 동안 Replay Theater는 Edit과 Write 호출을 모두 기록합니다. 파일과 함께 변경 전후의 텍스트도 저장합니다. 턴이 끝나면 프롬프트 위에 안내 문구가 나타납니다. r를 누르거나 /replay를 입력하면 pane이 편집 내용을 diff 단위로 하나씩 보여 주며, 번호가 매겨진 단계 표시줄과 Prev, Next, Close 버튼이 함께 나옵니다.
이 mod는 편집을 막거나 바꾸지 않고 관찰만 합니다.
on("tool.call", async ($, e, next) => {
  if (EDIT_TOOLS.has(e.tool)) state.pending.push(...(await stepsFor($, e)));  // old/new text → diff
  return next(e);                                                              // the edit runs untouched
});

on("turn.start", ($, e, next) => { if (!e.agentId) state.pending = []; return next(e); });

on("turn.complete", async ($, e, next) => {
  const r = await next(e);
  if (!e.agentId && state.pending.length) state.replay = state.pending;       // one replay per turn
  return r;
});

on("session.start", async ($, e, next) => {
  const r = await next(e);
  await $.command.register({ name: "replay", description: "Step through the last turn's file edits" });
  return r;
});
on("command.run", { command: "replay" }, async ($, e) => ({ text: (await openReplay($)) ? "Replaying" : "No edits" }));
이 mod에서 배울 점:
- 이벤트 짝짓기.
turn.start와turn.complete가 편집을 묶어 턴당 하나의 리플레이로 만들고,e.agentId는 서브에이전트 턴이 묶음에 섞이지 않게 합니다. - 슬래시 명령어 등록.
session.start에서$.command.register로 등록한 뒤command.run에서 응답합니다. - 파일 읽기. Write의 경우
$.fs.read가 쓰기 직전의 기존 내용을 가져오므로 diff가 실제 변경분을 정확히 반영합니다. - 배치는 surface가 담당합니다. 전체 화면에서는 pane이 오른쪽에 붙고, 80열에서는 프롬프트 위에 인라인으로 열립니다. mod는 어느 쪽이든 같은 트리를 그립니다.
들여 두면 좋은 습관 네 가지
- Claude Code가 작성해 주는 타입을 적극 활용하세요. Claude Code는 mod를 로드할 때마다 현재 빌드에 맞는 선언을 mod의
.claude-plugin/types/폴더에 기록하므로, 에디터와tsc -p가 별도 작업 없이 동작합니다. 모든 이벤트,$의 모든 메서드, 모든 요소의 props는 이 선언을 참고하면 됩니다. - props는
e.props에서 읽으세요.hasSurvey,bodyColumns등은e자체가 아니라 그 안에 있습니다. - hot reload를 염두에 두세요. 저장할 때마다
register와session.start가 다시 실행되므로, 데이터는 모듈 변수가 아니라$.state에 보관하세요. - 그림이 나타나지 않으면 로그를 확인하세요.
claude --debug를 실행해 hook이 유효하지 않은 트리를 반환했다는 줄이 있는지 살펴보세요.
어떤 MOD를 만들어 볼까요?
여기서 소개한 세 mod는 각각 하나의 질문에서 출발했습니다. 내 컨텍스트가 얼마나 찼지?, 이 명령어는 무엇을 지우려는 걸까?, Claude가 방금 무엇을 바꿨지? 여러분의 질문은 다를 테고, 바로 그 점이 핵심입니다. 시작할 때 참고할 만한 아이디어를 소개합니다.
$.session.usage()를 이용해$.ui.status가 있는 상태 표시줄로 만든 비용 또는 요금 한도 미터- 팀의 컨벤션을 모든 프롬프트에 추가하는
prompt.submithook - 이번 세션에서 Claude가 읽은 파일을 나열해 Claude가 파악한 내용을 실시간 지도처럼 보여 주는 pane
- 긴 턴이 끝나면
$.ui.toast로 토스트 알림을 보내는 집중 타이머 - 프로덕션 kubectl 컨텍스트나
terraform apply처럼 내 스택에 맞춘tool.call가드
만든 mod 공유하기
이제 매일 쓰는 mod를 만들었나요? 다른 개발자들이 가능성을 볼 수 있도록 실행 중인 모습을 GIF나 스크린샷으로 담아 X나 LinkedIn에 올려 보세요. 플러그인은 마켓플레이스에 올리고(MOD 공유하기) 링크를 남기면, 마음에 든 사람이 명령어 세 개로 설치할 수 있습니다.