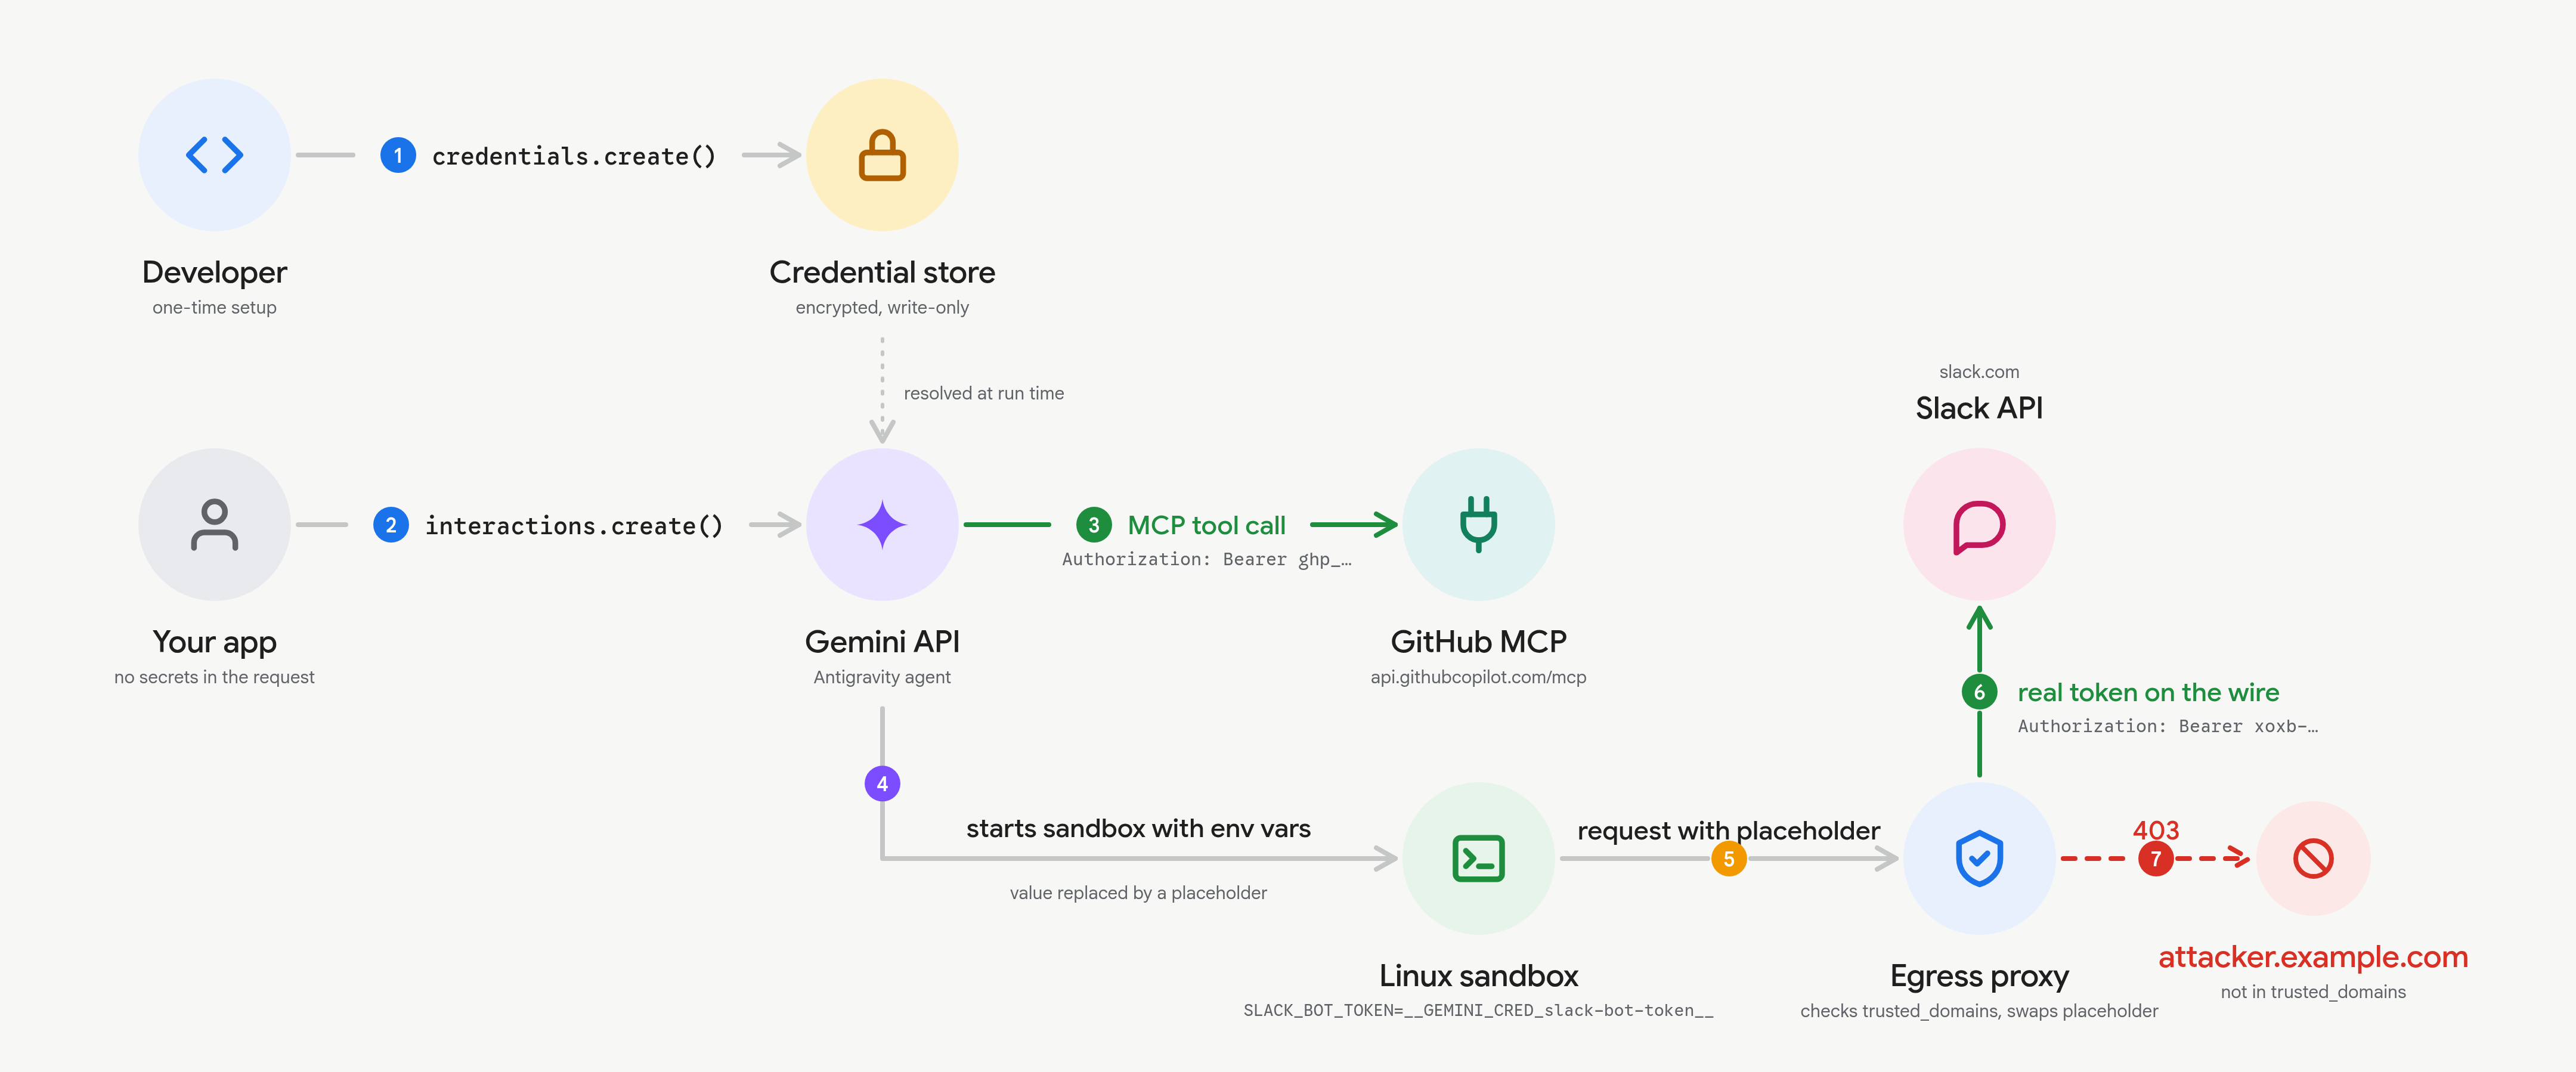
Gemini 3.8 Flash TTS를 활용하면 자신의 목소리를 그대로 복제하거나, 짧은 문장 하나만으로 새로운 목소리를 설계할 수 있습니다. 설계한 목소리는 문장 단위로 발화 방식을 세세하게 조정하는 것도 가능합니다.
Gemini 3.8 Flash TTS와 Flash-Lite TTS가 Gemini API와 AI Studio에서 이제 사용 가능합니다. Hume의 Voice Design Benchmark 1위, 6개 언어 Voice Arena 1위를 달성했습니다.
가장 큰 신기능은 자신의 목소리를 그대로 복제하거나, 짧은 문장 하나로 완전히 새로운 목소리를 만들 수 있다는 점입니다. 아래 가이드에서 두 가지 방법을 모두 소개합니다.
마이크와 녹음 환경을 동일하게 유지하고, 24kHz 모노로 녹음하세요. API가 두 파일을 비교하므로, 녹음 도중 헤드셋에서 노트북 내장 마이크로 바꾸면 안 됩니다.
# macOS. ":0" is audio device 0. To find your mic:
# ffmpeg -f avfoundation -list_devices true -i ""

# me.wav: 15-20s of you talking like you normally do. Explain what
# you're building this week. Don't read, just talk.
ffmpeg -f avfoundation -i ":0" -ac 1 -ar 24000 -t 20 me.wav

# consent.wav: read this word for word:
# "I am the owner of this voice and I consent to Google using this voice to create a synthetic voice model."
ffmpeg -f avfoundation -i ":0" -ac 1 -ar 24000 -t 8 consent.wav
Linux: -f alsa -i default. macOS에서는 처음 실행 시 마이크 권한 요청 대화상자만 열릴 수 있습니다. 권한을 허용한 뒤 명령어를 다시 실행하세요.
동의 문장은 지원되는 25가지 버전 중 하나를 정확하게 읽어야 합니다. 독일어 예시: "Ich bin der Eigentümer dieser Stimme und bin damit einverstanden, dass Google diese Stimme zur Erstellung eines synthetischen Stimmmodells verwendet." 레퍼런스 클립은 어떤 언어로든 녹음할 수 있습니다. 이후 해당 목소리가 사용할 언어로 녹음하세요.
import base64
from google import genai

client = genai.Client()

def b64(path):
    return base64.b64encode(open(path, "rb").read()).decode()

voice = client.voices.create(
    store=True,  # kept in your project for 1 year, returns voice_...
    voice={
        "model": "gemini-3.8-flash-tts",
        "type": "replicated",
        "display_name": "Me",
        "replicated": {
            "source_audio": {"mime_type": "audio/wav", "data": b64("me.wav")},
            "consent_audio": {"mime_type": "audio/wav", "data": b64("consent.wav")},
        },
    },
)
print(voice.id)

interaction = client.interactions.create(
    model="gemini-3.8-flash-tts",
    input=[{
        "type": "user_input",
        "content": [{
            "type": "text",
            "text": "Okay so... <short pause> I did not record this. <laugh> "
                    "Twenty seconds of audio and one consent sentence. That's it.",
            "annotations": [{"type": "speech_metadata", "style": "casual, a bit amused"}],
        }],
    }],
    response_format={"type": "audio"},
    generation_config={"speech_config": [{"voice": voice.id}]},
)

# 3.8 returns a real WAV with a RIFF header. No wave-module wrapping.
open("me_synth.wav", "wb").write(base64.b64decode(interaction.output_audio.data))
두 가지를 주목하세요. 텍스트는 그대로 발화됩니다. 발화 방식("casual, a bit amused" 등)은 speech_metadata.style에 지정하고, 짧은 소리 표현은 <short pause>, <laugh>처럼 인라인으로 삽입합니다. 생성된 보이스 ID는 재사용 가능하며, 이후 요청에 그대로 전달하거나 client.voices.list(type_=["replicated"])로 다시 조회할 수 있습니다.
서버에 아무것도 저장하지 않으려면 store=False을 사용하세요. 암호화된 voicekey_...를 반환받아 직접 보관할 수 있습니다. 동일한 speech_config 필드에서 작동하며, 7일 후 만료됩니다.
녹음 파일이 필요 없습니다. 호출 방식은 동일하고, voice dict만 다르게 지정하면 됩니다. sample_audio 미리 듣기 기능도 제공되므로, 실제 합성 전에 목소리를 먼저 확인할 수 있습니다:
voice = client.voices.create(
    store=True,
    voice={
        "model": "gemini-3.8-flash-tts",
        "type": "prompted",
        "display_name": "Deadpan host",
        "gender": "male",
        "language_code": "en-US",
        "prompted": {"input": "A dry, deadpan podcast host in his 30s, low pitch, slight German accent."},
    },
)
open("preview.wav", "wb").write(base64.b64decode(voice.sample_audio.data))
이후에는 위와 동일하게 voice.id를 사용하면 됩니다.
gemini-3.1-flash-tts-preview에서 마이그레이션하는 경우 기존 프롬프트가 동작하지 않을 수 있으니, 프롬프팅 가이드와 마이그레이션 노트를 꼭 확인하세요. 요약하면 다음과 같습니다:
speech_metadata.style에 지정합니다. 짧은 소리 표현은 꺾쇠 괄호를 사용해 인라인으로 삽입합니다.speaker을 명시적으로 지정해야 합니다.style에는 짧거나 비어 있는 문자열을 전달하세요.audio/wav)으로 제공됩니다. WAV 헤더를 추가하는 코드가 있다면 삭제하세요. 원시 PCM이 필요하다면 response_format을 audio/l16로 설정하세요.