Philipp Schmid블로그
토큰 노출 없이 GitHub를 활용하는 매니지드 에이전트 구축하기
PAT(개인 액세스 토큰)를 노출하지 않고 GitHub CLI를 사용하는 Gemini 매니지드 에이전트를 구축하는 방법을 소개합니다. 이그레스 프록시가 실제 토큰을 외부 요청에 자동으로 주입하는 구조로, 샌드박스 환경에는 더미 토큰만 전달됩니다.
GitHub CLI(gh)를 Gemini API 매니지드 에이전트 내에서 실행할 때, GitHub PAT(개인 액세스 토큰)를 샌드박스에 노출하지 않아도 됩니다.
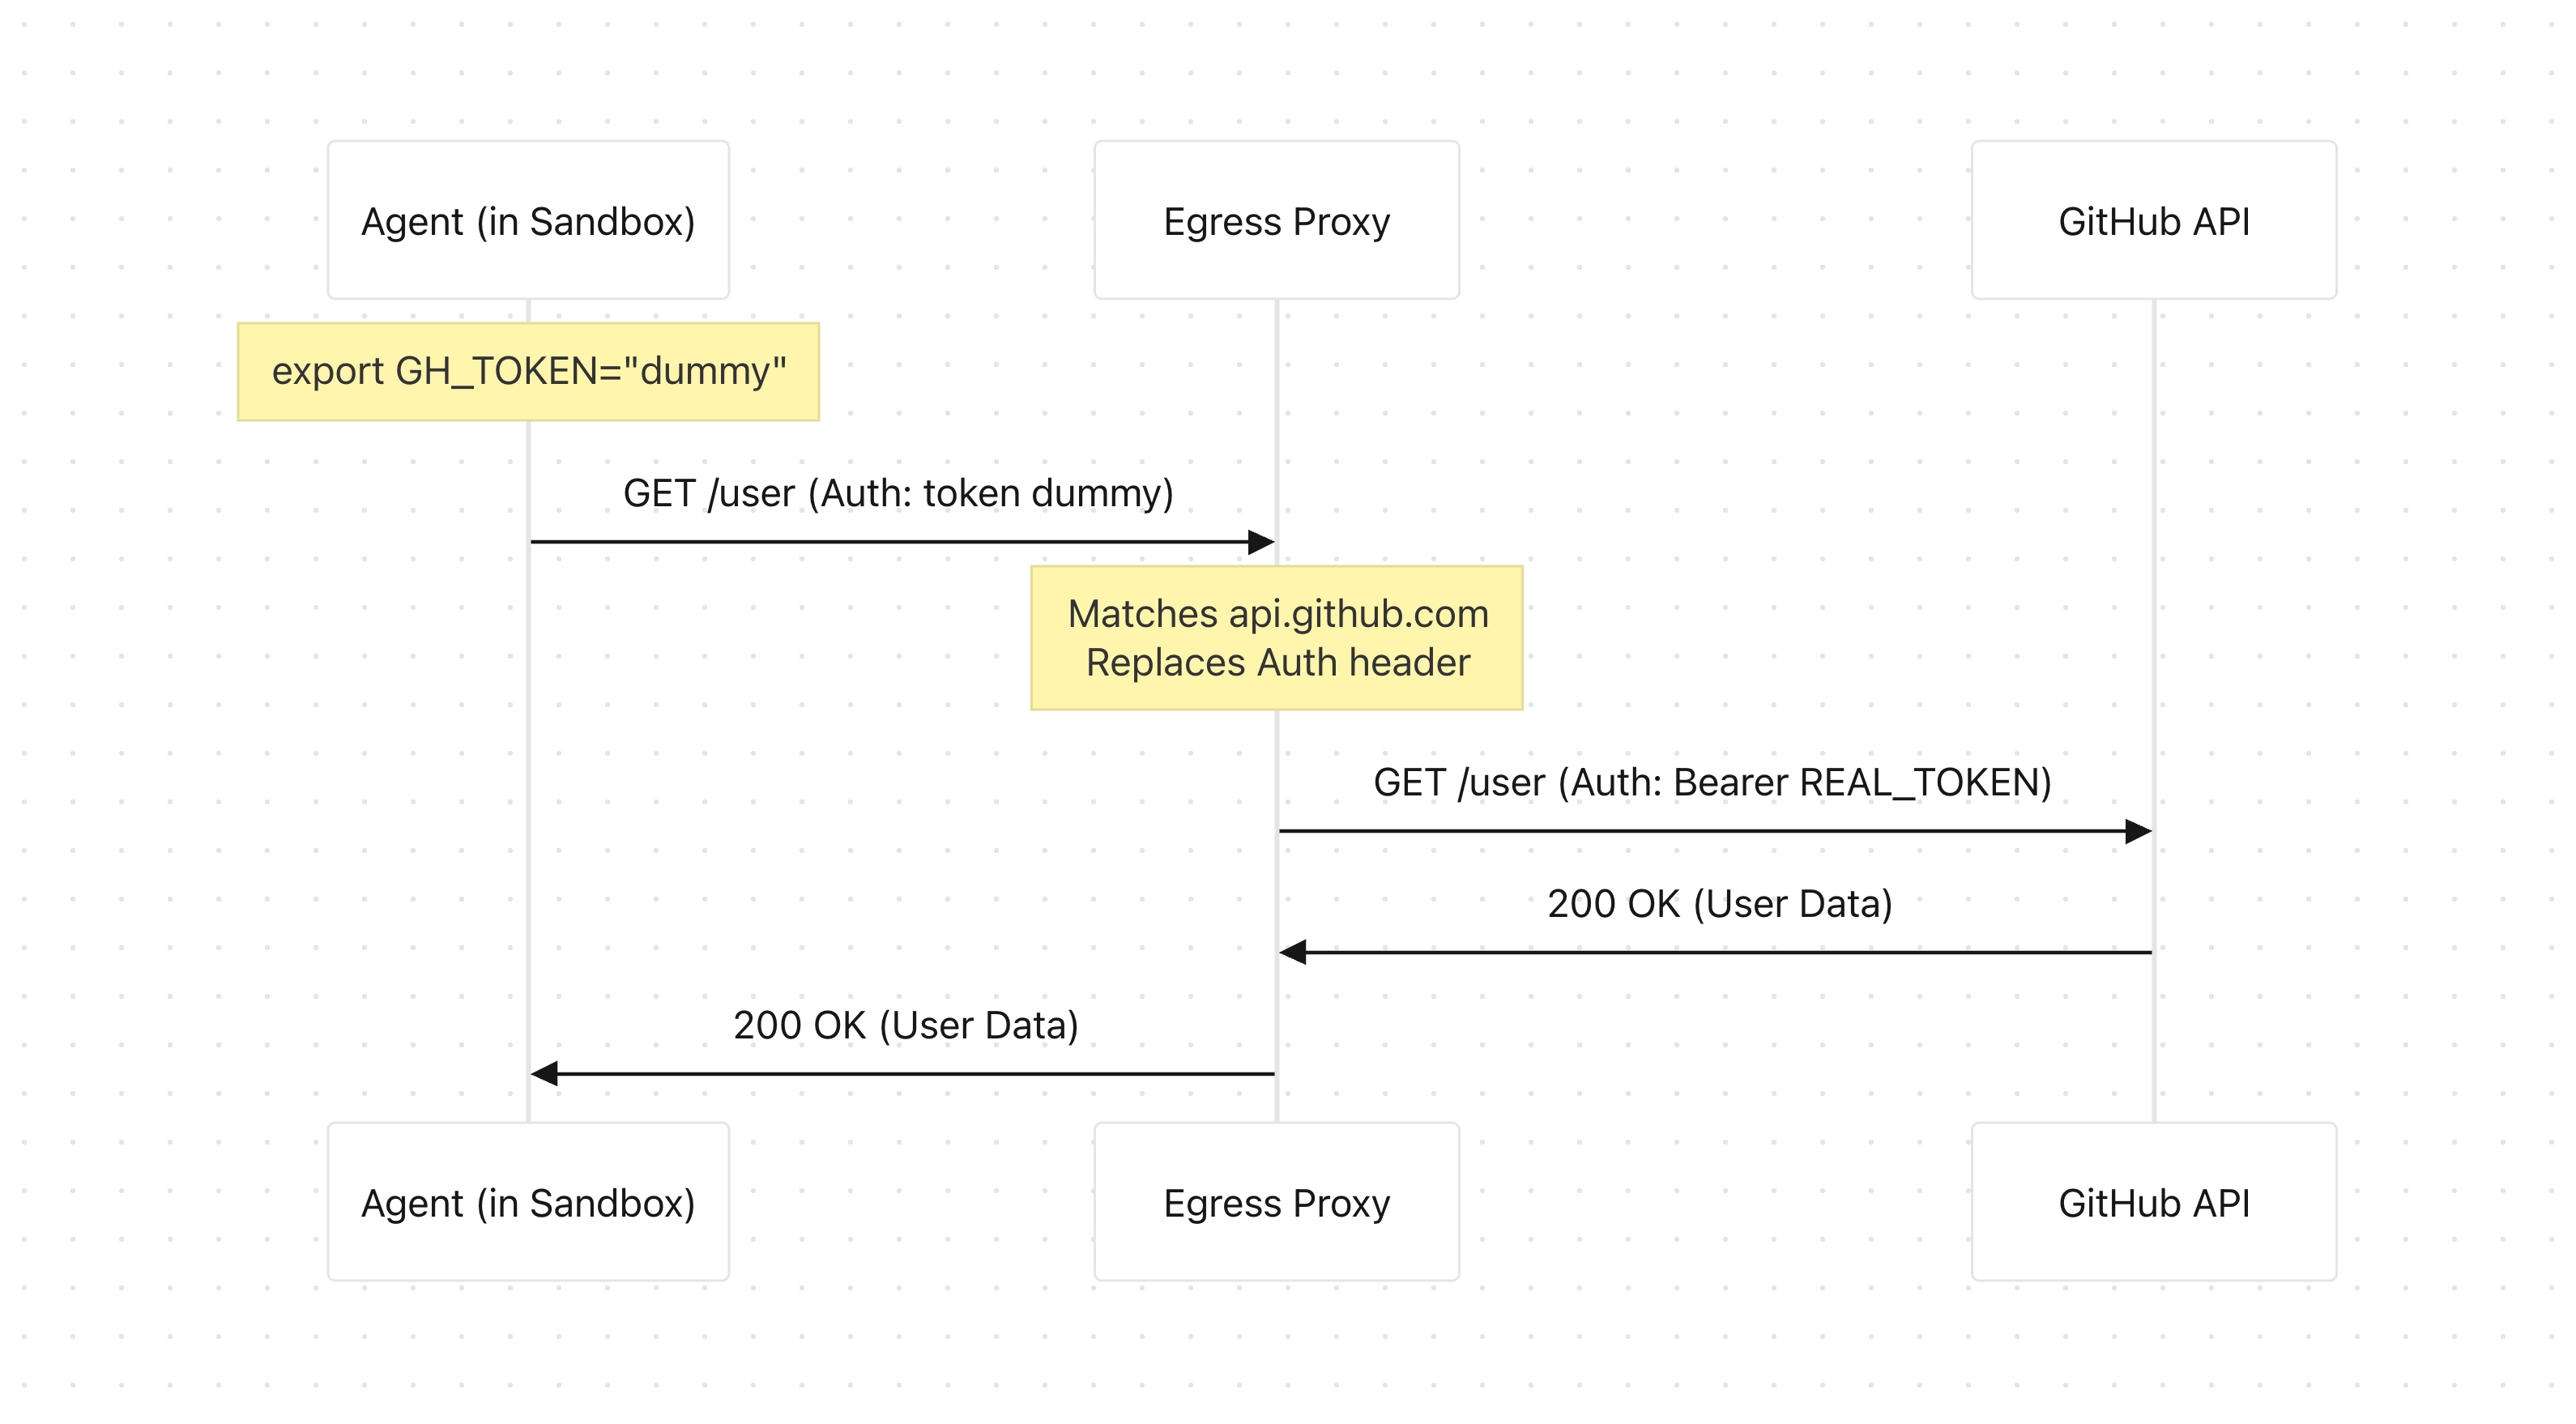
네트워크 구성의 이그레스 프록시가 외부 요청에 실제 토큰을 자동으로 주입합니다. 에이전트는 샌드박스 내부에서 더미 토큰만 사용하므로, 실제 토큰은 샌드박스 안으로 절대 들어오지 않습니다.
동작 원리
- 더미 토큰: 에이전트가 샌드박스 내부에서
GH_TOKEN="dummy"를 내보내어gh의 로컬 인증 확인을 통과시킵니다. - 요청 인터셉트: 이그레스 프록시가
api.github.com또는github.com로 향하는 요청을 가로챕니다. - 토큰 교체: 프록시가
Authorization헤더의 더미 토큰을 실제 토큰으로 대체합니다. - 보안: 실제 토큰은 컨트롤 플레인에 보관되며, 샌드박스 내부에서는 절대 노출되지 않습니다.
사전 준비
-
Gemini API 키: Google AI Studio에서 발급받으세요.
-
GitHub PAT(개인 액세스 토큰): 에이전트가 접근할 특정 저장소로만 범위를 제한한 세분화된 PAT 사용을 권장합니다.
생성 방법은 다음과 같습니다.
- GitHub → 설정(Settings) → 개발자 설정(Developer settings) → 개인 액세스 토큰(Personal access tokens) → 세분화된 토큰(Fine-grained tokens) 순서로 이동하거나, 여기를 클릭하세요.
- Generate new token을 클릭합니다.
- Repository access 항목에서 접근할 저장소를 선택합니다.
- Permissions → Repository permissions에서 아래 항목을 설정합니다.
- Contents:
Access: Read and write(코드 클론 및 푸시용) - Pull requests:
Access: Read and write(PR 생성, 리뷰, 댓글 작성용) - Issues:
Access: Read and write(이슈 생성 및 댓글 작성용)
- Contents:
- Generate token을 클릭한 후 토큰을 복사해 두세요. 이후에는 다시 확인할 수 없습니다.
예제
아래 Python 예제는 격리된 임시 Linux 환경에서 에이전트를 실행하고, 헤더 변환 설정이 포함된 네트워크 허용 목록을 구성한 뒤 gh을 실행합니다.
import base64
import os
from google import genai

# GitHub PAT from host
GITHUB_PAT = os.environ.get("GITHUB_PAT")
if not GITHUB_PAT:
    raise ValueError("Set GITHUB_PAT environment variable on the host.")

# Base64-encode for Git HTTPS auth
git_auth_str = f"x-oauth-basic:{GITHUB_PAT}"
git_auth_base64 = base64.b64encode(git_auth_str.encode("utf-8")).decode("utf-8")

client = genai.Client()

# Shim: auto-installs gh, injects dummy token, ensures git HTTPS and no prompt
shim_script = """#!/bin/bash
REAL_GH="/workspace/gh_install/bin/gh"

if [ ! -f "$REAL_GH" ]; then
    echo "GitHub CLI not found. Installing to /workspace/gh_install..." >&2
    mkdir -p /workspace/gh_install
    curl -sSLo /workspace/gh_install/gh.tar.gz https://github.com/cli/cli/releases/download/v2.40.1/gh_2.40.1_linux_amd64.tar.gz >&2
    tar --no-same-owner -xf /workspace/gh_install/gh.tar.gz -C /workspace/gh_install --strip-components=1 >&2
    rm -f /workspace/gh_install/gh.tar.gz >&2
    echo "GitHub CLI installed." >&2
fi

export GH_TOKEN="dummy_token_to_bypass_cli_check"
export GIT_TERMINAL_PROMPT=0
"$REAL_GH" config set git_protocol https >/dev/null 2>&1 || true
exec "$REAL_GH" "$@"
"""

agent_prompt = """
Use the GitHub CLI wrapper at `/workspace/bin/gh` to show the logged in user info, and clone the repository 'octocat/Spoon-Knife' to '/workspace/Spoon-Knife'.
"""

interaction = client.interactions.create(
    agent="antigravity-preview-05-2026",
    input=agent_prompt,
    environment={
        "type": "remote",
        "sources": [
            {
                "type": "inline",
                "content": shim_script,
                "target": "/workspace/bin/gh"
            }
        ],
        "network": {
            "allowlist": [
                {
                    "domain": "api.github.com", # GitHub API
                    "transform": [{"Authorization": f"Bearer {GITHUB_PAT}"}]
                },
                {
                    "domain": "github.com", # Git over HTTPS rule
                    "transform": [{"Authorization": f"Basic {git_auth_base64}"}]
                },
                {
                    "domain": "*"
                }
            ]
        }
    }
)

print(interaction.output_text)
# Logged in as philschmid; cloned octocat/Spoon-Knife to /workspace/Spoon-Knife
GitHub는 요청 유형에 따라 서로 다른 인증 방식을 사용합니다. api.github.com에 대한 API 호출에는 Bearer 토큰이 필요하고, github.com를 통한 Git 작업에는 base64로 인코딩된 Basic 인증이 필요합니다.
와일드카드 항목("domain": "*")을 통해 샌드박스는 gh 바이너리 다운로드, 릴리스 에셋 가져오기 등 나머지 요청도 처리할 수 있습니다. 더 엄격한 제어가 필요하다면 objects.githubusercontent.com처럼 특정 도메인만 허용하도록 설정하세요.
지속형 "GitHub 에이전트"
에이전트를 자율적으로 운영하고 매번 초기화 시간을 줄이려면, gh CLI를 자동 설치하는 매니지드 에이전트를 생성하면 됩니다. 첫 번째 상호작용 이후 환경을 재사용하여 설치된 gh 바이너리를 호출 간에 유지할 수 있습니다.
import base64
import os
from google import genai

# GitHub PAT from host
GITHUB_PAT = os.environ.get("GITHUB_PAT", "TOKEN_HERE")

git_auth_str = f"x-oauth-basic:{GITHUB_PAT}"
git_auth_base64 = base64.b64encode(git_auth_str.encode("utf-8")).decode("utf-8")

client = genai.Client()

system_instruction = """
You are a senior code reviewer. You have access to the GitHub CLI via a shim wrapper script at `/workspace/bin/gh`.
First run `chmod +x /workspace/bin/gh` so that the wrapper script is executable. Then always use `/workspace/bin/gh` (or `bash /workspace/bin/gh`) for any GitHub operations.
Do NOT use the standard `gh` command directly, as it will not have the correct authentication token.
"""

# Shim: auto-installs gh, injects dummy token, forces HTTPS and disables interactive prompts
shim_script = """#!/bin/bash
REAL_GH="/workspace/gh_install/bin/gh"

if [ ! -f "$REAL_GH" ]; then
    echo "GitHub CLI not found. Installing to /workspace/gh_install..." >&2
    mkdir -p /workspace/gh_install
    curl -sSLo /workspace/gh_install/gh.tar.gz https://github.com/cli/cli/releases/download/v2.40.1/gh_2.40.1_linux_amd64.tar.gz >&2
    tar --no-same-owner -xf /workspace/gh_install/gh.tar.gz -C /workspace/gh_install --strip-components=1 >&2
    rm -f /workspace/gh_install/gh.tar.gz >&2
    echo "GitHub CLI installed." >&2
fi

export GH_TOKEN="dummy_token_to_bypass_cli_check"
export GIT_TERMINAL_PROMPT=0
"$REAL_GH" config set git_protocol https >/dev/null 2>&1 || true
exec "$REAL_GH" "$@"
"""

client.agents.create(
    id="github-reviewer-agent",
    base_agent="antigravity-preview-05-2026",
    base_environment={
        "type": "remote",
        "sources": [
            {
                "type": "inline",
                "content": shim_script,
                "target": "/workspace/bin/gh"
            },
            {
                "type": "inline",
                "content": system_instruction,
                "target": "/AGENTS.md"
            }
        ],
        "network": {
            "allowlist": [
                {
                    "domain": "api.github.com",
                    "transform": [{"Authorization": f"Bearer {GITHUB_PAT}"}]
                },
                {
                    "domain": "github.com",
                    "transform": [{"Authorization": f"Basic {git_auth_base64}"}]
                },
                {"domain": "*"}
            ]
        }
    }
)
첫 번째 상호작용에서 기본 환경을 복제하고 gh 설치가 시작됩니다.
interaction_1 = client.interactions.create(
    agent="github-reviewer-agent",
    input="Which GitHub user is logged in?",
    environment="remote",
)

print(interaction_1.output_text)
# ... currently logged-in GitHub user is **philschmid**.
이후 호출에서는 interaction_1.environment_id를 전달하여 동일한 컨테이너를 재사용하면, 설치된 gh 바이너리와 네트워크 변환 설정이 그대로 유지됩니다. 대화 히스토리를 이어가려면 previous_interaction_id=interaction_1.id도 함께 전달하세요.
interaction_2 = client.interactions.create(
    agent="github-reviewer-agent",
    input="View the pull request #12 in repository 'octocat/Spoon-Knife' and summarize the changes.",
    environment=interaction_1.environment_id,
    previous_interaction_id=interaction_1.id
)

print(interaction_2.output_text)
# Based on the inspection of pull request #12 in the
마치며
샌드박스에 시크릿을 넣지 않고도 매니지드 에이전트에 GitHub 접근 권한을 부여할 수 있습니다. 더미 토큰으로 gh의 로컬 인증을 통과시키고, 이그레스 프록시가 외부로 나가는 요청에 실제 PAT를 주입하는 구조입니다.
매니지드 에이전트, 실행 환경, 네트워크 변환에 대한 자세한 내용은 매니지드 에이전트 문서와 네트워크 구성을 참고하세요.
읽어주셔서 감사합니다! 질문이나 의견이 있으시면 Twitter 또는 LinkedIn으로 편하게 연락 주세요.