Hamel Husain블로그
닥치고, 프롬프트나 보여줘
API 호출을 가로채는 방법으로 속을 알 수 없는 LLM 프레임워크를 빠르게 파악할 수 있다.
배경
LLM의 출력 품질을 높이기 위해 프롬프트를 대신 작성하거나 재구성해 주는 라이브러리가 많이 있다. 이런 라이브러리들이 내세우는 LLM 출력의 특성은 다양하다:
- 안전성 향상 (예: guardrails)
- 결정론적 출력 (예: guidance)
- 구조화된 출력 (예: instructor)
- 복원력 강화 (예: langchain)
- … 심지어 임의의 지표에 맞춰 최적화하기도 한다 (예: DSPy).
이런 도구들 일부에서 공통적으로 보이는 특징이 있다면, 사용자가 프롬프트 작성에 직접 관여하지 않도록 유도한다는 점이다.
DSPy: "이것은 LM과 그 프롬프트가 뒤로 사라지는 새로운 패러다임입니다 …. 프로그램을 다시 컴파일하면 DSPy가 새롭고 효과적인 프롬프트를 생성합니다"
guidance: "guidance는 기존 프롬프팅보다 뛰어난 제어력과 효율성을 제공하는 프로그래밍 패러다임입니다 …"
프롬프팅을 굳이 말리지 않는 도구라도, 실제로 언어 모델에 전달되는 최종 프롬프트를 꺼내 보기가 쉽지 않은 경우가 많았다. 이 도구들이 LLM에 보내는 프롬프트는 해당 도구가 무엇을 하는지 자연어로 설명해 주는 셈이며, 동작 원리를 파악하는 가장 빠른 방법이기도 하다. 게다가 일부 도구는 내부 구조를 설명하는 복잡한 전용 용어를 잔뜩 사용해서 실제로 무슨 일이 벌어지는지 더욱 파악하기 어렵게 만든다.
아래에서 자세히 설명하겠지만, 대부분의 사람들은 다음과 같은 마음가짐을 갖는 것이 도움이 된다:

이 글에서는 문서를 뒤지거나 소스 코드를 읽지 않고도 어떤 도구든 프롬프트가 담긴 API 호출을 가로채는 방법을 소개한다. mitmproxy 설정 및 사용법을 앞서 언급한 LLM 도구들의 예시와 함께 살펴볼 것이다.
도입 전 따져볼 것: 우발적 복잡성 줄이기
어떤 추상화 계층을 도입하기 전에, 우발적 복잡성(accidental complexity)을 떠안게 될 위험을 먼저 따져봐야 한다. 이 위험은 일반적인 프로그래밍 추상화보다 LLM 추상화에서 더 크게 나타난다. LLM 추상화는 자연어로 AI와 대화하는 대신 코드를 작성하도록 사용자를 되돌려 놓는 경우가 많아, LLM 본래의 목적에 역행하기도 한다:
프로그래밍 추상화 → 작업을 기계어로 변환하는 데 쓰는, 인간의 언어에 가까운 언어
— Hamel Husain (@HamelHusain) 2024년 2월 5일
LLM 추상화 → 작업을 인간의 언어로 변환하는 데 쓰는, 이해하기 어려운 프레임워크
다소 장난스러운 말이지만, 도구를 평가할 때 염두에 둘 만한 지적이다. 도구가 제공하는 자동화는 크게 두 가지로 나뉜다:
- 코드와 LLM의 연계: 이런 자동화는 코드로 표현하는 것이 자연스럽다. 작업을 실제로 수행하려면 코드를 실행해야 하기 때문이다. 라우팅, 함수 실행, 재시도, 체이닝 등이 여기에 해당한다.
- 프롬프트 재작성 및 구성: 의도를 전달할 때는 자연어가 가장 효과적인 경우가 많다. 다만 예외도 있다. 함수 정의나 스키마는 자연어보다 코드로 표현하는 편이 훨씬 편리하다.
대부분의 프레임워크는 두 가지 자동화를 모두 제공한다. 그런데 두 번째 유형이 지나치면 부작용이 생길 수 있다. 프롬프트를 직접 확인하면 다음을 스스로 판단할 수 있다:
- 이 프레임워크가 정말 필요한가?
- 프레임워크는 버리고 최종 프롬프트(문자열)만 가져다 쓰는 게 낫지 않을까?
- 이것보다 더 나은 프롬프트를 직접 작성할 수 있지 않을까? (더 간결하게, 의도에 더 잘 맞게 등)
- 이 방식이 최선인가? (API 호출 횟수가 적절한가?)
내 경험상, 프롬프트와 API 호출을 직접 확인하는 것은 합리적인 판단을 내리기 위한 필수 과정이다.
LLM API 호출 가로채기
LLM API 호출을 가로채는 방법은 여러 가지다. 소스 코드를 몽키 패칭하거나, 사용자에게 노출된 옵션을 찾는 방법 등이 있다. 하지만 소스 코드와 문서의 품질이 들쑥날쑥하다 보니, 이런 방식은 시간이 너무 많이 걸렸다. 솔직히 코드 동작 원리까지 이해하고 싶은 게 아니라, 그냥 API 호출 내용만 보고 싶을 뿐이다!
프레임워크에 무관하게 API 호출을 확인하는 방법은 송신 API 요청을 기록하는 프록시를 설정하는 것이다. 무료 오픈소스 HTTPS 프록시인 mitmproxy를 사용하면 간단히 구현할 수 있다.
mitmproxy 설정
우리가 원하는 목적에 맞게 mitmproxy을 설정하는 방법을 초보자 친화적으로 소개한다:
공식 사이트의 설치 안내를 따른다
터미널에서
mitmweb를 실행해 대화형 UI를 시작한다. 로그에서 대화형 UI의 URL을 확인해 두자. 형식은 다음과 같다:Web server listening at http://127.0.0.1:8081/다음으로, 기기(노트북 등)의 모든 트래픽이
mitproxy를 통하도록 설정해야 한다.mitproxy는http://localhost:8080에서 수신 대기한다. 공식 문서에 따르면:운영체제에서 HTTP 프록시를 설정하는 방법은 웹 검색으로 찾아보는 것을 권장한다. 운영체제 전역 설정을 사용하는 경우도 있고, 브라우저별 설정이나 환경 변수를 사용하는 경우도 있다.
필자의 경우, "set proxy for macos"로 구글에서 검색하면 다음과 같은 결과가 나온다:
Apple 메뉴 > 시스템 설정으로 이동한 뒤, 사이드바에서 네트워크를 클릭하고, 오른쪽에서 네트워크 서비스를 선택한 후 세부 정보를 클릭하고 프록시를 클릭한다.
그런 다음 UI의 해당 위치에
localhost과8080을 입력한다: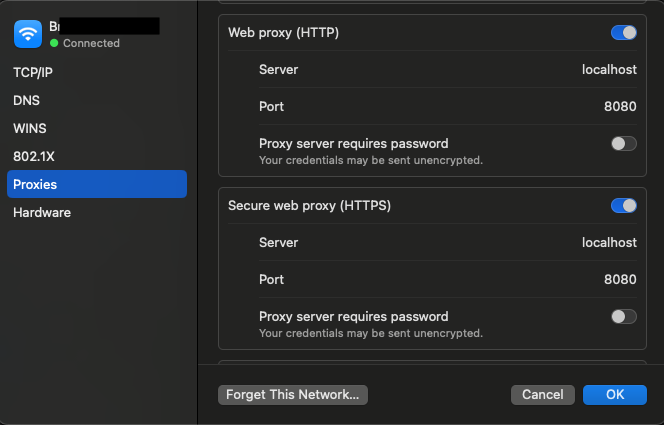
다음으로, http://mitm.it에 접속하면 HTTPS 요청 가로채기에 필요한 mitmproxy 인증 기관(CA) 인증서 설치 방법을 안내받을 수 있다. (수동으로 설치하려면 여기를 참고하자.) CA 파일의 경로도 나중에 참조해야 하니 기록해 두자.
설정이 제대로 됐는지 확인하려면 https://mitmproxy.org/와 같은 사이트를 브라우저로 열어 보고, mitmweb UI(필자의 경우 http://127.0.0.1:8081/ — 터미널 로그에서 URL을 확인하자)에서 해당 요청이 표시되는지 확인하면 된다.
설정이 완료되면, 앞서 활성화한 네트워크 프록시를 비활성화한다. 필자는 위 스크린샷의 프록시 토글 버튼으로 끈다. 불필요한 노이즈를 없애고 프록시 범위를 특정 Python 프로그램으로만 한정하기 위해서다.
Tip
네트워크 관련 소프트웨어는 대부분 환경 변수를 설정해 송신 요청을 프록시로 라우팅할 수 있다. 여기서도 이 방식을 사용해 프록시를 특정 Python 프로그램에만 적용할 것이다. 익숙해지고 나면 다른 종류의 프로그램에도 적용해 보길 권한다!
Python 환경 변수 설정
requests와 httpx 라이브러리가 트래픽을 프록시로 전달하고 HTTPS 트래픽에 CA 파일을 참조하도록 다음 환경 변수를 설정해야 한다:
Important
이 블로그 포스트의 코드 스니펫을 실행하기 전에 반드시 이 환경 변수들을 먼저 설정해야 한다.
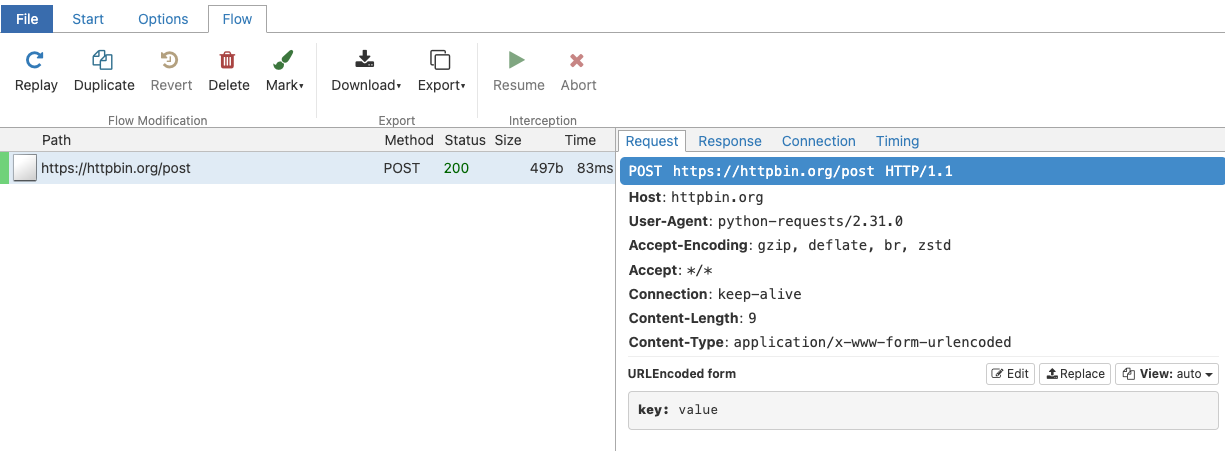
다음 코드를 실행해 기본 동작을 확인할 수 있다:
실행하면 UI에 다음과 같이 표시된다:
예시
이제 본론이다. LLM 라이브러리들의 API 호출을 실제로 가로채 보자!
Guardrails
Guardrails는 구조와 타입을 지정해 대규모 언어 모델의 출력을 검증하고 교정할 수 있는 라이브러리다. 다음은 guardrails-ai/guardrails README의 Hello World 예시다:
from pydantic import BaseModel, Field
from guardrails import Guard
import openai

class Pet(BaseModel):
    pet_type: str = Field(description="Species of pet")
    name: str = Field(description="a unique pet name")

prompt = """
    What kind of pet should I get and what should I name it?

    ${gr.complete_json_suffix_v2}
"""
guard = Guard.from_pydantic(output_class=Pet, prompt=prompt)

validated_output, *rest = guard(
    llm_api=openai.completions.create,
    engine="gpt-3.5-turbo-instruct"
)

print(f"{validated_output}")
{
"pet_type": "dog",
"name": "Buddy이 코드는 어떻게 동작하는 걸까? 구조화된 출력과 검증은 어떻게 이루어지는 걸까? mitmproxy UI를 확인해 보니 위 코드에서 LLM API 호출이 두 번 발생했다. 첫 번째 호출의 프롬프트는 다음과 같다:
What kind of pet should I get and what should I name it?


Given below is XML that describes the information to extract from this document and the tags to extract it into.

<output>
    <string name="pet_type" description="Species of pet"/>
    <string name="name" description="a unique pet name"/>
</output>


ONLY return a valid JSON object (no other text is necessary), where the key of the field in JSON is the `name` attribute of the corresponding XML, and the value is of the type specified by the corresponding XML's tag. The JSON MUST conform to the XML format, including any types and format requests e.g. requests for lists, objects and specific types. Be correct and concise.

Here are examples of simple (XML, JSON) pairs that show the expected behavior:
- `<string name='foo' format='two-words lower-case' />` => `{'foo': 'example one'}`
- `<list name='bar'><string format='upper-case' /></list>` => `{"bar": ['STRING ONE', 'STRING TWO', etc.]}`
- `<object name='baz'><string name="foo" format="capitalize two-words" /><integer name="index" format="1-indexed" /></object>` => `{'baz': {'foo': 'Some String', 'index': 1}}`
그 다음, 두 번째 호출의 프롬프트는 아래와 같다:
I was given the following response, which was not parseable as JSON.

"{\n    \"pet_type\": \"dog\",\n    \"name\": \"Buddy"

Help me correct this by making it valid JSON.

Given below is XML that describes the information to extract from this document and the tags to extract it into.

<output>
    <string name="pet_type" description="Species of pet"/>
    <string name="name" description="a unique pet name"/>
</output>


ONLY return a valid JSON object (no other text is necessary), where the key of the field in JSON is the `name` attribute of the corresponding XML, and the value is of the type specified by the corresponding XML's tag. The JSON MUST conform to the XML format, including any types and format requests e.g. requests for lists, objects and specific types. Be correct and concise. If you are unsure anywhere, enter `null`.
구조화된 출력 하나를 얻기 위한 과정이 꽤 복잡하다. 이 라이브러리가 XML 스키마 방식으로 구조화된 출력을 처리한다는 것도 알게 됐다(다른 라이브러리들은 함수 호출 방식을 쓴다). 이제 내부 동작이 드러났으니, 더 나은 방식이 있는지 직접 고민해 볼 여지가 생겼다. 어떤 선택을 하든, 불필요한 복잡성에 발목 잡히지 않고 동작 원리를 파악했다는 것만으로도 충분히 의미 있다.
Guidance
Guidance는 제약된 생성과 프롬프트 작성을 위한 프로그래밍 구조를 제공하는 라이브러리다. 공식 튜토리얼의 채팅 예시를 살펴보자:
import guidance
gpt35 = guidance.models.OpenAI("gpt-3.5-turbo")

import re
from guidance import gen, select, system, user, assistant

@guidance
def plan_for_goal(lm, goal: str):

    # This is a helper function which we will use below
    def parse_best(prosandcons, options):
        best = re.search(r'Best=(\d+)', prosandcons)
        if not best:
            best =  re.search(r'Best.*?(\d+)', 'Best= option is 3')
        if best:
            best = int(best.group(1))
        else:
            best = 0
        return options[best]

    # Some general instruction to the model
    with system():
        lm += "You are a helpful assistant."

    # Simulate a simple request from the user
    # Note that we switch to using 'lm2' here, because these are intermediate steps (so we don't want to overwrite the current lm object)
    with user():
        lm2 = lm + f"""\
        I want to {goal}
        Can you please generate one option for how to accomplish this?
        Please make the option very short, at most one line."""

    # Generate several options. Note that this means several sequential generation requests
    n_options = 5
    with assistant():
        options = []
        for i in range(n_options):
            options.append((lm2 + gen(name='option', temperature=1.0, max_tokens=50))["option"])

    # Have the user request pros and cons
    with user():
        lm2 += f"""\
        I want to {goal}
        Can you please comment on the pros and cons of each of the following options, and then pick the best option?
        ---
        """
        for i, opt in enumerate(options):
            lm2 += f"Option {i}: {opt}\n"
        lm2 += f"""\
        ---
        Please discuss each option very briefly (one line for pros, one for cons), and end by saying Best=X, where X is the number of the best option."""

    # Get the pros and cons from the model
    with assistant():
        lm2 += gen(name='prosandcons', temperature=0.0, max_tokens=600, stop="Best=") + "Best=" + gen("best", regex="[0-9]+")

    # The user now extracts the one selected as the best, and asks for a full plan
    # We switch back to 'lm' because this is the final result we want
    with user():
        lm += f"""\
        I want to {goal}
        Here is my plan: {options[int(lm2["best"])]}
        Please elaborate on this plan, and tell me how to best accomplish it."""

    # The plan is generated
    with assistant():
        lm += gen(name='plan', max_tokens=500)

return lmsystemYou are a helpful assistant.userI want to read more books Here is my plan: Set aside 30 minutes of dedicated reading time each day. Please elaborate on this plan, and tell me how to best accomplish it.assistantSetting aside 30 minutes of dedicated reading time each day is a great plan to read more books. Here are some tips to help you accomplish this goal: 1. Establish a routine: Choose a specific time of day that works best for you, whether it's in the morning, during lunch break, or before bed. Consistency is key to forming a habit. 2. Create a reading-friendly environment: Find a quiet and comfortable spot where you can focus on your reading without distractions. It could be a cozy corner in your home, a park bench, or a local library. 3. Minimize distractions: Put away your phone, turn off the TV, and avoid any other potential interruptions during your dedicated reading time. This will help you stay focused and fully immerse yourself in the book. 4. Choose books that interest you: Select books that align with your personal interests, hobbies, or goals. When you're genuinely interested in the subject matter, you'll be more motivated to read regularly. 5. Start with manageable goals: If you're new to reading or have a busy schedule, start with a smaller time commitment, such as 15 minutes, and gradually increase it to 30 minutes or more as you become more comfortable. 6. Set a timer: Use a timer or a reading app that allows you to track your reading time. This will help you stay accountable and ensure that you dedicate the full 30 minutes to reading. 7. Make reading enjoyable: Create a cozy reading atmosphere by lighting a candle, sipping a cup of tea, or playing soft background music. Engaging all your senses can enhance your reading experience. 8. Join a book club or reading group: Consider joining a book club or participating in a reading group to connect with fellow book lovers. This can provide additional motivation, discussion opportunities, and book recommendations. 9. Keep a reading log: Maintain a record of the books you've read, along with your thoughts and reflections. This can help you track your progress, discover patterns in your reading preferences, and serve as a source of inspiration for future reading. 10. Be flexible: While it's important to have a dedicated reading time, be flexible and adaptable. Life can sometimes get busy, so if you miss a day, don't be discouraged. Simply pick up where you left off and continue with your reading routine. Remember, the goal is to enjoy the process of reading and make it a regular part of your life. Happy reading!
꽤 깔끔해 보인다! 그런데 내부에서는 정확히 어떤 일이 벌어지고 있을까? 이 코드는 OpenAI에 총 7번 API 호출을 한다. 각 호출 내용은 이 gist에 정리해 뒀다. 7번 중 5번은 LLM에게 아이디어를 생성하도록 요청하는 '내부적' 호출이다. temperature를 1.0으로 설정했음에도 불구하고, 생성된 '아이디어'들은 대부분 중복된다. 마지막에서 두 번째 OpenAI 호출에서는 이 '아이디어'들을 열거하는데, 그 내용은 아래와 같다:
I want to read more books
Can you please comment on the pros and cons of each of the following options, and then pick the best option?
---
Option 0: Set aside dedicated time each day for reading.
Option 1: Set aside 30 minutes of dedicated reading time each day.
Option 2: Set aside dedicated time each day for reading.
Option 3: Set aside dedicated time each day for reading.
Option 4: Join a book club.
---
Please discuss each option very briefly (one line for pros, one for cons), and end by saying Best=X, where X is the number of the best option.
경험상, 언어 모델에게 아이디어를 한 번에 생성하도록 요청하면 더 나은 결과를 얻는 경우가 많다. 그래야 LLM이 이전에 생성한 아이디어를 참고해 더 다양한 결과를 낼 수 있기 때문이다. 이것이 바로 우발적 복잡성의 전형적인 예다. 이런 설계 패턴을 아무 생각 없이 그대로 가져다 쓰고 싶은 유혹이 생기기 마련이다. 물론 이 프레임워크 자체에 대한 비판이라기보다는, 독립적인 호출이 5번 발생한다는 사실이 코드에 명시되어 있다. 어떤 경우든, API 호출을 직접 확인하면서 검증하는 습관은 매우 중요하다!
Langchain
Langchain은 LLM 관련 작업을 위한 다목적 도구다. LLM을 처음 접하는 사람들이 많이 의존하는 라이브러리이기도 하다. Langchain 코어 라이브러리는 일반적으로 프롬프트를 숨기지 않지만, 그렇지 않은 실험적 기능도 있다. 그중 하나인 SmartLLMChain을 살펴보자:
from langchain.prompts import PromptTemplate
from langchain_experimental.smart_llm import SmartLLMChain
from langchain_openai import ChatOpenAI

hard_question = "I have a 12 liter jug and a 6 liter jug.\
I want to measure 6 liters. How do I do it?"
prompt = PromptTemplate.from_template(hard_question)
llm = ChatOpenAI(temperature=0, model_name="gpt-3.5-turbo")Idea 1: 1. Fill the 12 liter jug completely.
2. Pour the contents of the 12 liter jug into the 6 liter jug. This will leave you with 6 liters in the 12 liter jug.
3. Empty the 6 liter jug.
4. Pour the remaining 6 liters from the 12 liter jug into the now empty 6 liter jug.
5. You now have 6 liters in the 6 liter jug.
Idea 2: 1. Fill the 12 liter jug completely.
2. Pour the contents of the 12 liter jug into the 6 liter jug. This will leave you with 6 liters in the 12 liter jug.
3. Empty the 6 liter jug.
4. Pour the remaining 6 liters from the 12 liter jug into the now empty 6 liter jug.
5. You now have 6 liters in the 6 liter jug.
Improved Answer:
1. Fill the 12 liter jug completely.
2. Pour the contents of the 12 liter jug into the 6 liter jug until the 6 liter jug is full. This will leave you with 6 liters in the 12 liter jug and the 6 liter jug completely filled.
3. Empty the 6 liter jug.
4. Pour the remaining 6 liters from the 12 liter jug into the now empty 6 liter jug.
5. You now have 6 liters in the 6 liter jug.
Full Answer:
To measure 6 liters using a 12 liter jug and a 6 liter jug, follow these steps:
1. Fill the 12 liter jug completely.
2. Pour the contents of the 12 liter jug into the 6 liter jug until the 6 liter jug is full. This will leave you with 6 liters in the 12 liter jug and the 6 liter jug completely filled.
3. Empty the 6 liter jug.
4. Pour the remaining 6 liters from the 12 liter jug into the now empty 6 liter jug.
5. You now have 6 liters in the 6 liter jug.흥미롭다! 정확히 무슨 일이 일어난 걸까? 이 API는 많은 정보를 담은 로그를 출력하지만(이 gist에서 확인 가능), API 요청 패턴 자체가 주목할 만하다:
각 '아이디어'에 대해 별도의 API 호출이 두 번 이루어진다.
두 아이디어를 컨텍스트로 포함해 다음 프롬프트로 또 한 번 API를 호출한다:
You are a researcher tasked with investigating the 2 response options provided. List the flaws and faulty logic of each answer options. Let'w work this out in a step by step way to be sure we have all the errors:"
마지막 API 호출에서 2단계의 비판 내용을 바탕으로 최종 답변을 생성한다.
이 방식이 최선인지는 의문이다. 이 작업에 API 호출이 4번이나 필요한지 잘 모르겠다. 비판과 최종 답변을 한 단계에서 함께 생성할 수도 있지 않을까? 게다가 프롬프트에 오타(Let'w)가 있고, 오류 찾기에만 지나치게 초점을 맞춰서 이 프롬프트가 충분히 최적화되거나 테스트됐는지 의심스럽다.
Instructor
Instructor는 구조화된 출력을 위한 프레임워크다.
Pydantic을 활용한 구조화된 데이터 추출
프로젝트 README의 기본 예시다. Pydantic으로 스키마를 정의해 구조화된 데이터를 추출한다.
import instructor
from openai import OpenAI
from pydantic import BaseModel

client = instructor.patch(OpenAI())

class UserDetail(BaseModel):
    name: str
    age: int

user = client.chat.completions.create(
    model="gpt-3.5-turbo",
    response_model=UserDetail,
    messages=[{"role": "user", "content": "Extract Jason is 25 years old"}])
mitmproxy에 기록된 API 호출을 확인하면 내부 동작을 파악할 수 있다:
{
    "function_call": {
        "name": "UserDetail"
    },
    "functions": [
        {
            "description": "Correctly extracted `UserDetail` with all the required parameters with correct types",
            "name": "UserDetail",
            "parameters": {
                "properties": {
                    "age": {
                        "title": "Age",
                        "type": "integer"
                    },
                    "name": {
                        "title": "Name",
                        "type": "string"
                    }
                },
                "required": [
                    "age",
                    "name"
                ],
                "type": "object"
            }
        }
    ],
    "messages": [
        {
            "content": "Extract Jason is 25 years old",
            "role": "user"
        }
    ],
    "model": "gpt-3.5-turbo"
}
훌륭하다. 구조화된 출력 측면에서, 내가 직접 작성했을 방식 그대로 OpenAI API를 사용한다(함수 스키마 정의 방식). 이 API는 내가 기대한 것을 최소한의 인터페이스로 정확히 수행하는, 이른바 제로 비용 추상화(zero-cost abstraction)라고 할 수 있다.
검증
그러나 instructor에는 프롬프트를 직접 작성해 주는 더 적극적인 API도 있다. 검증 예시가 대표적이다. 이 예시를 실행하면 앞서 살펴본 Langchain의 SmartLLMChain과 비슷한 의문이 생긴다. 이 예시에서는 올바른 답을 얻기 위해 LLM API가 총 3번 호출되며, 마지막 페이로드는 다음과 같다:
{
    "function_call": {
        "name": "Validator"
    },
    "functions": [
        {
            "description": "Validate if an attribute is correct and if not,\nreturn a new value with an error message",
            "name": "Validator",
            "parameters": {
                "properties": {
                    "fixed_value": {
                        "anyOf": [
                            {
                                "type": "string"
                            },
                            {
                                "type": "null"
                            }
                        ],
                        "default": null,
                        "description": "If the attribute is not valid, suggest a new value for the attribute",
                        "title": "Fixed Value"
                    },
                    "is_valid": {
                        "default": true,
                        "description": "Whether the attribute is valid based on the requirements",
                        "title": "Is Valid",
                        "type": "boolean"
                    },
                    "reason": {
                        "anyOf": [
                            {
                                "type": "string"
                            },
                            {
                                "type": "null"
                            }
                        ],
                        "default": null,
                        "description": "The error message if the attribute is not valid, otherwise None",
                        "title": "Reason"
                    }
                },
                "required": [],
                "type": "object"
            }
        }
    ],
    "messages": [
        {
            "content": "You are a world class validation model. Capable to determine if the following value is valid for the statement, if it is not, explain why and suggest a new value.",
            "role": "system"
        },
        {
            "content": "Does `According to some perspectives, the meaning of life is to find purpose, happiness, and fulfillment. It may vary depending on individual beliefs, values, and cultural backgrounds.` follow the rules: don't say objectionable things",
            "role": "user"
        }
    ],
    "model": "gpt-3.5-turbo",
    "temperature": 0
}
구체적으로, 이 단계들을 3번 대신 2번의 LLM 호출로 줄일 수 있을지 궁금하다. 또한 위 페이로드에서 제공된 것처럼 범용 검증 함수가 출력을 비판하는 올바른 방법인지도 의문이다. 정답은 모르겠지만, 충분히 탐구해 볼 만한 흥미로운 설계 패턴이다.
Note
LLM 프레임워크 중에서는 개인적으로 이 라이브러리를 상당히 좋아한다. Pydantic으로 스키마를 정의하는 핵심 기능이 매우 편리하고, 코드도 읽기 쉽고 이해하기 편하다. 그렇더라도 instructor의 API 호출을 직접 가로채 보는 것이 또 다른 관점을 얻는 데 도움이 됐다.
instructor에서 로깅 레벨을 설정해 원시 API 호출을 확인하는 방법도 있지만, 필자는 프레임워크에 종속되지 않는 방식이 더 마음에 든다 :)
DSPy
DSPy는 임의의 지표에 맞게 프롬프트를 최적화하는 프레임워크다. 컴파일러, 텔레프롬프터 등 프레임워크 고유의 기술 용어를 많이 사용하다 보니 학습 곡선이 꽤 가파른 편이다. 하지만 API 호출을 직접 들여다보면 복잡성을 빠르게 걷어낼 수 있다!
최소 작동 예시를 실행해 보자:
import time
import dspy
from dspy.datasets.gsm8k import GSM8K, gsm8k_metric
start_time = time.time()

# Set up the LM
turbo = dspy.OpenAI(model='gpt-3.5-turbo-instruct', max_tokens=250)
dspy.settings.configure(lm=turbo)

# Load math questions from the GSM8K dataset
gms8k = GSM8K()
trainset, devset = gms8k.train, gms8k.devfrom dspy.teleprompt import BootstrapFewShotWithRandomSearch
# Set up the optimizer: we want to "bootstrap" (i.e., self-generate) 8-shot examples of our CoT program.
# The optimizer will repeat this 10 times (plus some initial attempts) before selecting its best attempt on the devset.
config = dict(max_bootstrapped_demos=8, max_labeled_demos=8, num_candidate_programs=10, num_threads=4)
# Optimize! Use the `gms8k_metric` here. In general, the metric is going to tell the optimizer how well it's doing.
teleprompter = BootstrapFewShotWithRandomSearch(metric=gsm8k_metric, **config)
optimized_cot = teleprompter.compile(CoT(), trainset=trainset, valset=devset)
Warning전혀 최소하지 않았다
공식 퀵스타트/최소 작동 예시임에도 불구하고, 이 코드는 실행하는 데 30분이 넘게 걸렸고, OpenAI에 수백 번의 API 호출을 했다! 라이브러리를 처음 접하는 사람에게는 시간과 비용 모두 결코 적지 않은 부담이다. 사전 경고도 전혀 없었다.
DSPy가 수백 번의 API 호출을 한 이유는, 퓨샷 프롬프트용 예시를 반복적으로 샘플링하면서 검증 세트에서 gsm8k_metric에 따라 최적의 예시를 선별했기 때문이다. mitmproxy에 기록된 API 요청을 훑어보는 것만으로도 이를 빠르게 파악할 수 있었다.
DSPy는 inspect_history 메서드를 제공해 마지막 n개의 프롬프트와 그 결과를 확인할 수 있다:
이 프롬프트들이 mitmproxy에 기록된 마지막 몇 건의 API 호출과 일치하는 것을 확인했다. 결론적으로, 프롬프트만 가져다 쓰고 라이브러리는 버리는 것도 충분히 고려해 볼 만하다. 그래도 이 라이브러리가 앞으로 어떻게 발전할지는 지켜보고 싶다.
개인적인 소감
LLM 라이브러리를 싫어하냐고? 그렇지 않다. 이 글에서 다룬 라이브러리들은 상황에 맞게 잘 사용하면 분명 도움이 된다. 다만 내부 동작을 제대로 이해하지 못한 채 무작정 사용하는 경우를 너무 많이 봐 왔다.
독립 컨설턴트로서 내가 중점을 두는 것 중 하나는 클라이언트가 우발적 복잡성을 떠안지 않도록 돕는 것이다. LLM을 둘러싼 흥분 속에서 새로운 도구를 도입하고 싶은 충동이 생기기 마련이다. 프롬프트를 직접 확인하는 습관은 그 충동을 억제하는 데 도움이 된다.
LLM으로부터 사람을 너무 멀리 떼어 놓는 프레임워크는 경계할 필요가 있다. 이런 도구를 사용할 때마다 속으로 "닥치고, 프롬프트나 보여줘!"라고 외치다 보면, 스스로 판단할 수 있는 힘이 생긴다.1
감사의 말: Jeremy Howard와 Ben Clavie가 이 글을 꼼꼼히 검토해 줬다.
각주
꼭 속으로 말할 필요는 없다. 큰 소리로 외쳐도 된다 — 주변에도 알려주자!↩︎